github.com/XiaoMi/Gaea@v1.2.5/models/connection.md (about) 1 # Gaea 数据库中间件连线说明 2 3 > - 整个 Gaea 设定值读取和写入的逻辑由 Gaea/models/store.go 进行处理 4 > - 这份文档主要在说明 如何在设定文档上,设定对数据库中间件 Gaea 连线相关设定值后,立即进行连线 5 > 目前支援的设定方式 6 > 1. 文档 File 7 > 2. 网路 Etcd V2 API 8 > 3. 网路 Etcd V3 API 9 > 10 11 ## 1 测试环境说明 12 13 ### 1 测试环境架构 14 15 丛集名称为 gaea_cluster,内含两个数据库 Cluster 16 17 1. 数据库丛集一 Cluster1,1台 Master 和 2 台 Slave,数据库名称为 novel ,数据表为 Book_0000 18 2. 数据库丛集二 Cluster2,1台 Master 和 2 台 Slave,数据库名称为 novel ,数据表为 Book_0001 19 20 以下为架构图 21 22 <img src="./assets/image-20220127114256168.png" alt="image-20220127114256168" style="zoom:80%;" /> 23 24 ### 2 测试环境的数据库 Schema 25 26 表名不管是 Book_0000 或者是 Book_0001,都使用相同的 Schema 27 28 ```sql 29 -- 创建数据表 Book_0000 30 CREATE TABLE `novel`.`Book_0000` ( 31 `BookID` int(11) NOT NULL, 32 `Isbn` bigint(50) NOT NULL, 33 `Title` varchar(100) NOT NULL, 34 `Author` varchar(30) DEFAULT NULL, 35 `Publish` int(4) DEFAULT NULL, 36 `Category` varchar(30) NOT NULL, 37 PRIMARY KEY (`BookID`) 38 ) ENGINE=InnoDB DEFAULT CHARSET=utf8; 39 40 -- 创建数据表 Book_0001 41 CREATE TABLE `novel`.`Book_0001` ( 42 `BookID` int(11) NOT NULL, 43 `Isbn` bigint(50) NOT NULL, 44 `Title` varchar(100) NOT NULL, 45 `Author` varchar(30) DEFAULT NULL, 46 `Publish` int(4) DEFAULT NULL, 47 `Category` varchar(30) NOT NULL, 48 PRIMARY KEY (`BookID`) 49 ) ENGINE=InnoDB DEFAULT CHARSET=utf8; 50 ``` 51 52 ## 2 设定值的内容 53 54 > 不管是要把设定值储存在文档还是在网路内,设定值会参考以下内容进行设定 55 56 ### 1 丛集名称设定内容 57 58 | 名称项目 | 设定值 | 说明 | 59 | ------------------ | ----------------------- | -------------------------------------- | 60 | 丛集名称 Cluster | gaea_cluster | 一个 Cluster 可以包含多个 Namespace | 61 | 命名空间 Namespace | novel_cluster_namespace | 属于丛集 gaea_cluster 内的一个命名空间 | 62 63 ### 2 数据库集群设定内容 64 65 | 数据库集群编号 | Mater 服务器 | Slave 服务器一 | Slave 服务器二 | 帐号 | 密码 | 66 | :------------: | :----------------: | :----------------: | :----------------: | :----: | :---: | 67 | 数据库集群1 | 192.168.122.2:3309 | 192.168.122.2:3310 | 192.168.122.2:3311 | xiaomi | 12345 | 68 | 数据库集群2 | 192.168.122.2:3312 | 192.168.122.2:3313 | 192.168.122.2:3314 | xiaomi | 12345 | 69 70 ### 3 切片设定值内容 71 72 | 数据库集群编号 | 对应的切片名称 | 数据表名称 | 是否预设 | 73 | :------------: | :------------: | :--------: | :------: | 74 | 数据库集群1 | slice-0 | Book_0000 | 是 | 75 | 数据库集群2 | slice-1 | Book_0001 | 否 | 76 77 ### 4 分片演算法设定值 78 79 | 演算法设定项目 | 演算法设定值 | 说明 | 80 | -------------- | --------------------- | ------------------------------------------------------------ | 81 | 用户名称 | hash | Kingshard Hash 分片演算法 | 82 | 分表依据的键值 | BookID | 会以 BookID 的数值作为分表的依据 | 83 | 数据表数量 | [1,1] | 阵列 [1,1] 分别指出每一个切片的数据表数量,比如<br />slice-0 有 1 张 数据表,<br />slice-1 有 1 张 数据表 | 84 | 切片列表阵列 | ["slice-0","slice-1"] | 此命名空间里,有两个切片,分别为 slice-0 和 slice-1 | 85 86 ### 5 命名空间操作用户设定值 87 88 | 用户设定项目 | 用户设定值 | 说明 | 89 | ------------ | --------------------------------------- | ------------------------------------------------------------ | 90 | 用户名称 | xiaomi | | 91 | 用户密码 | 12345 | | 92 | 命名空间名称 | novel_cluster_namespace | | 93 | 用户读写标记 | rw_flag 为 2 ,该用户可进行 读写 操作 | rw_flag 为 1,只能进行 唯读 操作<br />rw_flag 为 2,可进行 读写 操作 | 94 | 读写分离标记 | rw_split 为 1,该用户进行 读写分离 操作 | rw_split 为 0,进行 非读写分离 操作<br />rw_split 为 1,进行 读写分离 操作 | 95 96 ### 6 命名空间 JSON 格式设定值 97 98 命名空间 JSON 格式设定值 内容如下,这份设定值可以储存在 设定文档 里或 网路 中,设定值都一模一样 99 100 ```json 101 { 102 "name": "novel_cluster_namespace", 103 "online": true, 104 "read_only": false, 105 "allowed_dbs": { 106 "novel": true 107 }, 108 "slow_sql_time": "1000", 109 "black_sql": [ 110 "" 111 ], 112 "allowed_ip": null, 113 "slices": [ 114 { 115 "name": "slice-0", 116 "user_name": "xiaomi", 117 "password": "12345", 118 "master": "192.168.122.2:3309", 119 "slaves": ["192.168.122.2:3310", "192.168.122.2:3311"], 120 "statistic_slaves": null, 121 "capacity": 12, 122 "max_capacity": 24, 123 "idle_timeout": 60 124 }, 125 { 126 "name": "slice-1", 127 "user_name": "xiaomi", 128 "password": "12345", 129 "master": "192.168.122.2:3312", 130 "slaves": ["192.168.122.2:3313", "192.168.122.2:3314"], 131 "statistic_slaves": null, 132 "capacity": 12, 133 "max_capacity": 24, 134 "idle_timeout": 60 135 } 136 ], 137 "shard_rules": [ 138 { 139 "db": "novel", 140 "table": "Book", 141 "type": "hash", 142 "key": "BookID", 143 "locations": [ 144 1, 145 1 146 ], 147 "slices": [ 148 "slice-0", 149 "slice-1" 150 ] 151 } 152 ], 153 "users": [ 154 { 155 "user_name": "xiaomi", 156 "password": "12345", 157 "namespace": "novel_cluster_namespace", 158 "rw_flag": 2, 159 "rw_split": 1, 160 "other_property": 0 161 } 162 ], 163 "default_slice": "slice-0", 164 "global_sequences": null 165 } 166 ``` 167 168 ## 3 命名空间设定值储存方式 169 170 > 目前支援设定档的读取方式为,整个逻辑由 Gaea/models/store.go 控制 171 > 172 > 1. 方法一:使用文档 File 去储存设定值 173 > 2. 方法二:使用网路 Etcd V2 API 去储存设定值 174 > 3. 方法三:使用网路 Etcd V3 API 去储存设定值 175 176 ### 1 使用文档 File 储存 177 178 > 当准备使用文档 File 去储存设定值时,需要修改改两个设定文档 179 > 180 > 1. 初始化设定文档,位于 Gaea/etc/gaea.ini 181 > 2. 命名空间设定文档,集中于目录 Gaea/etc/file/namespace/ 182 183 修正初始化设定文档 Gaea/etc/gaea.ini,指定以下内容 184 185 1. 使用设定文档 File 去储存设定值 186 2. 丛集名称为 gaea_cluster 187 188 把设定文档 Gaea/etc/gaea.ini 修正成以下内容 189 190 ```ini 191 ; 这里的重点在把 config_type 值改成 file,并修改丛集名称!!!!! 192 193 ; config type, etcd/file, you can test gaea with file type, you shoud use etcd in production 194 config_type=file 195 ; file config path, 具体配置放到file_config_path的namespace目录下,该下级目录为固定目录 196 file_config_path=./etc/file 197 198 ; 在这里指定丛集名称为 gaea_cluster 199 cluster_name=gaea_cluster 200 201 ; 以下略过,因为重点要把前面的 config_type 设定值改成 file 202 ``` 203 204 - 在目录 Gaea/etc/file/namespace 下新增一个命名空间设定档,档名为 novel_cluster_namespace.json,内容为 小说数据库丛集 的相关设定 205 206 - 在命名空间设定文档内 novel_cluster_namespace.json 内指定命名空间名称为 novel_cluster_namespace 207 208 把设定文档 Gaea/etc/file/namespace/novel_cluster_namespace.json 填入 命名空间 Json 格式设定值,如以下内容所示 209 210 ```json 211 { 212 "name": "novel_cluster_namespace", 213 "online": true, 214 "read_only": false, 215 "allowed_dbs": { 216 "novel": true 217 }, 218 "slow_sql_time": "1000", 219 "black_sql": [ 220 "" 221 ], 222 "allowed_ip": null, 223 "slices": [ 224 以下略 225 ``` 226 227 ### 2 使用网路 Etcd 储存 228 229 > 这次直接用 Gui 工具把设定值写入 Etcd 容器 230 231 修正初始化设定文档 Gaea/etc/gaea.ini,指定以下内容 232 233 1. 使用 Etcd 服务器去储存设定值 234 2. 丛集名称为 gaea_cluster 235 3. 指定 Etcd 的网路位置为 http://127.0.0.1:2379 236 237 把设定文档 Gaea/etc/gaea.ini 修正成以下内容 238 239 ```ini 240 ; 这里的重点在把 config_type 值改成 file,并修改丛集名称!!!!! 241 242 ; config type, etcd/file/etcdv3, you can test gaea with file type, you shoud use etcd/etcdv3 in production 243 ; 请指定设定方式为 file 或 etcd 或 etcdv3 244 config_type=etcdv3 245 ; file config path, 具体配置放到file_config_path的namespace目录下,该下级目录为固定目录 246 file_config_path=./etc/file 247 248 ; 在这里指定丛集名称为 gaea_cluster 249 cluster_name=gaea_cluster 250 251 ; 在这里指定 Etcd 服务器的网路位置 252 coordinator_addr=http://127.0.0.1:2379 253 254 ; 以下略过,因为重点要把前面的 config_type 设定值改成 file 255 ``` 256 257 在 Etcd 服务器内写入以下内容 258 259 - key 为 /gaea_cluster/namespace/novel_cluster_namespace 260 - value 为 之前提到的命名空间 Json 格式设定值 261 262 <img src="./assets/image-20220124113553383.png" alt="image-20220124113553383" style="zoom:80%;" /> 263 264 ## 4 启动数据库中间件 Gaea 265 266 > 启动的方式有分两种 267 > 268 > 1. 在终端机去下指令启动 Gaea 269 > 2. 使用 IDE 工具启动 Gaea 270 271 ### 1 建立执行文档的目录 272 273 ```bash 274 # 建立执行档集中目录 275 $ mkdir -p Gaea/bin/ 276 ``` 277 278 ### 2 在终端机去下指令启动 Gaea 279 280 先在终端机进行编译,后执行 281 282 ```bash 283 # GoRoot 和 GoPath 设定值 284 # GOROOT 位于 /usr/local/go #gosetup 285 # GOPATH 位于 /home/panhong/go #gosetup 286 287 # 到 Gaea 的专案目录 288 $ cd /home/panhong/go/src/github.com/panhongrainbow/Gaea 289 290 # 对 Gaea 主程式进行编译 291 $ /usr/local/go/bin/go build -o /home/panhong/go/src/github.com/panhongrainbow/Gaea/bin/gaea github.com/XiaoMi/Gaea/cmd/gaea #gosetup 292 293 # 执行数据库中间件 Gaea 294 $ /home/panhong/go/src/github.com/panhongrainbow/Gaea/bin/gaea 295 ``` 296 297 执行画面如下 298 299 <img src="./assets/image-20220124142003588.png" alt="image-20220124142003588" style="zoom:110%;" /> 300 301 ### 3 使用 IDE 工具启动 Gaea 302 303 在 IDE 工具内,填入以下内容 304 305 | 项目 | 配置 | 参数 | 306 | ---- | ---------- | ----------------------------------------------- | 307 | 1 | 名称 | gaea | 308 | 2 | 运行种类 | 软体包 | 309 | 3 | 软体包路径 | github.com/XiaoMi/Gaea/cmd/gaea | 310 | 4 | 输出目录 | /home/panhong/go/src/github.com/xiaomi/Gaea/bin | 311 | 5 | 建构后运行 | 打勾 | 312 | 6 | 工作目录 | /home/panhong/go/src/github.com/xiaomi/Gaea | 313 314 配置如下图 315 316 <img src="./assets/image-20220124143836664.png" alt="image-20220124143836664" /> 317 318 运行状况如下图 319 320 <img src="./assets/image-20220124145641452.png" alt="image-20220124145641452" style="zoom: 100%;" /> 321 322 ### 4 启动后服务发现 323 324 数据库中间件 Gaea 启动后,会在服务器 Etcd 里新增一个 key /gaea_cluster/proxy/proxy-127.0.0.1:13306 325 326 其 value 内容如下 327 328 ```json 329 { 330 "token": "127.0.0.1:13306", 331 "start_time": "2022-01-24 11:22:03.46517227 +0800 CST m=+0.066173904", 332 "ip": "127.0.0.1", 333 "proto_type": "tcp4", 334 "proxy_port": "13306", 335 "admin_port": "13307", 336 "pid": 10628, 337 "pwd": "/home/panhong/go/src/github.com/panhongrainbow/Gaea", 338 "sys": "Linux debian5 5.10.0-10-amd64 #1 SMP Debian 5.10.84-1 (2021-12-08) x86_64 GNU/Linux" 339 } 340 ``` 341 342 执行状况如下图 343 344 <img src="./assets/image-20220127142531692.png" alt="image-20220127142531692" style="zoom:80%;" /> 345 346 ## 5 登入数据库中间件 Gaea 347 348 数据库中间件 Gaea 启动后,直接进行登入 349 350 ```bash 351 # 登入 Gaea 指令如下 352 $ mysql -h 127.0.0.1 -P 13306 --protocol=TCP -u xiaomi -p 353 ``` 354 355 <img src="./assets/image-20220124154131750.png" alt="image-20220124154131750" style="zoom:60%;" /> 356 357 ## 6 测试数据库中间件 Gaea 的读写 358 359 > 登入数据库中间件 Gaea ,执行以下 SQL 语句 360 361 登入数据库中间件 Gaea,使用数据库 novel 362 363 ```bash 364 # 登入数据库中间件 Gaea 365 $ mysql -h 127.0.0.1 -P 13306 --protocol=TCP -u xiaomi -p 366 # Enter password: 367 # Welcome to the MariaDB monitor. Commands end with ; or \g. 368 # Your MySQL connection id is 10001 369 # Server version: 5.6.20-gaea Source distribution 370 371 # Copyright (c) 2000, 2018, Oracle, MariaDB Corporation Ab and others. 372 373 # Type 'help;' or '\h' for help. Type '\c' to clear the current input statement. 374 375 # 使用数据库 376 $ MySQL [(none)]> USE novel 377 # Reading table information for completion of table and column names 378 # You can turn off this feature to get a quicker startup with -A 379 380 # Database changed 381 # MySQL [novel]> 382 ``` 383 384 执行以下 SQL 语句 385 386 ```sql 387 -- 第一本小说 三国演义 388 INSERT INTO novel.Book (BookID, Isbn, Title, Author, Publish, Category) VALUES(1, 9781517191276, 'Romance Of The Three Kingdoms', 'Luo Guanzhong', 1522, 'Hi 389 storical fiction'); 390 391 -- 第二本小说 水浒传 392 INSERT INTO novel.Book (BookID, Isbn, Title, Author, Publish, Category) VALUES(2, 9789869442060, 'Water Margin', 'Shi Nai an', 1589, 'Historical fiction'); 393 394 -- 第三本小说 西游记 395 INSERT INTO novel.Book (BookID, Isbn, Title, Author, Publish, Category) VALUES(3, 9789575709518, 'Journey To The West', 'Wu Cheng en', 1592, 'Gods And Demon 396 s Fiction'); 397 ``` 398 399 登入数据库中间件 Gaea,执行三笔写入小说资料的 SQL 语句 400 401 <img src="./assets/image-20220124182118946.png" alt="image-20220124182118946" style="zoom:100%;" /> 402 403 登入第一组丛集,查询 Master 数据库的写入资料,三笔小说资料被分配到一笔 404 405  406 407 登入第一组丛集,查询第一台 Slave 数据库的写入资料,三笔小说资料被分配到一笔 408 409  410 411 登入第一组丛集,查询第二台 Slave 数据库的写入资料,三笔小说资料被分配到一笔 412 413  414 415 登入第二组丛集,查询 Master 数据库的写入资料,三笔小说资料被分配到两笔 416 417  418 419 登入第二组丛集,查询第一台 Slave 数据库的写入资料,三笔小说资料被分配到两笔 420 421 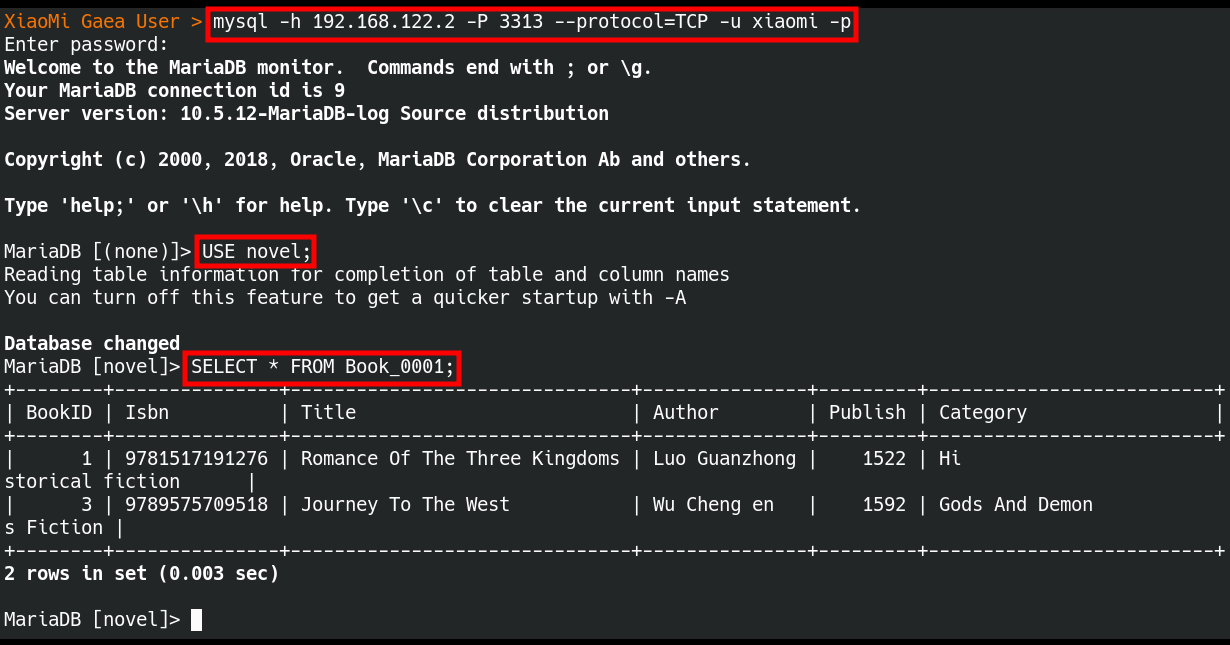 422 423 登入第二组丛集,查询第二台 Slave 数据库的写入资料,三笔小说资料被分配到两笔 424 425 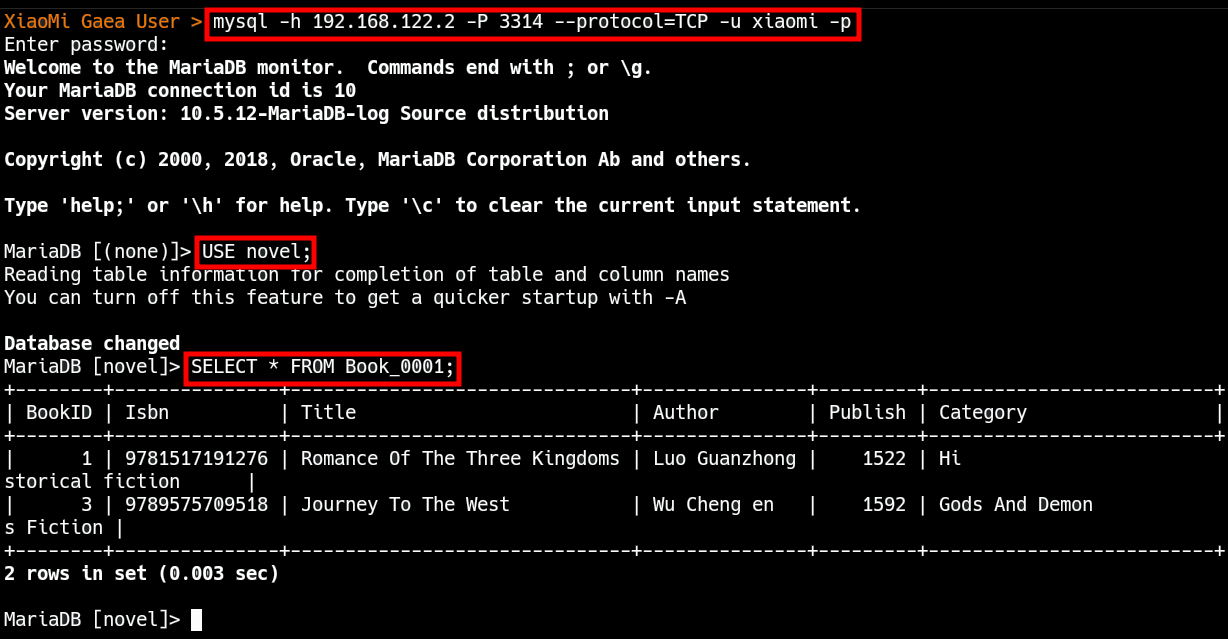 426 427 最后直接在数据库中间件 Gaea 查询全部三笔的小说资料 428 429 <img src="./assets/image-20220126175410955.png" alt="image-20220126175410955" style="zoom:80%;" />