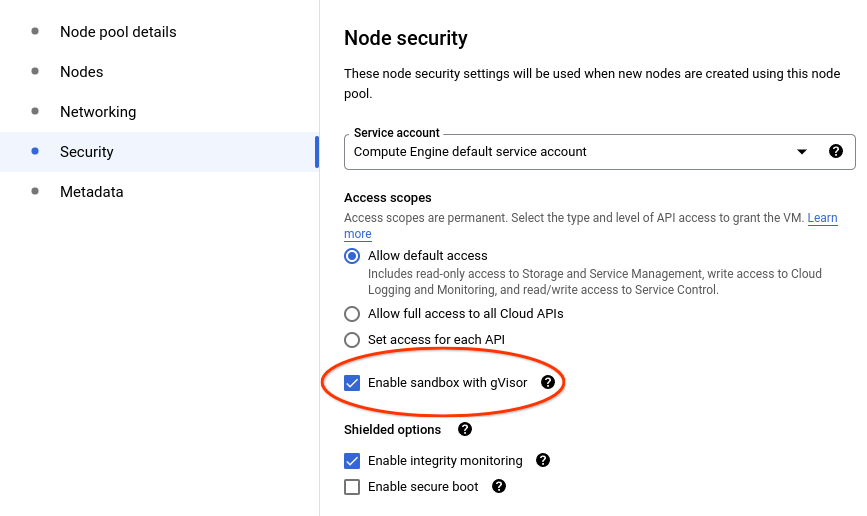
gvisor.dev/gvisor@v0.0.0-20240520182842-f9d4d51c7e0f/g3doc/user_guide/tutorials/kubernetes.md (about) 1 # WordPress with Kubernetes 2 3 This page shows you how to deploy a sample [WordPress][wordpress] site using 4 [GKE Sandbox][gke-sandbox]. 5 6 ### Before you begin 7 8 Take the following steps to enable the Kubernetes Engine API: 9 10 1. Visit the [Kubernetes Engine page][project-selector] in the Google Cloud 11 Platform Console. 12 1. Create or select a project. 13 14 ### Creating a node pool with gVisor enabled 15 16 Create a node pool inside your cluster with option `--sandbox type=gvisor` added 17 to the command, like below: 18 19 ```shell 20 gcloud container node-pools create gvisor --cluster=${CLUSTER_NAME?} --sandbox type=gvisor --machine-type=e2-standard-2 21 ``` 22 23 If you prefer to use the console, select your cluster and select the **ADD NODE 24 POOL** button: 25 26  27 28 Then click on the **Security** tab on the left and select **Enable sandbox with 29 gVisor** option. Select other options as you like: 30 31  32 33 ### Check that gVisor is enabled 34 35 The gvisor `RuntimeClass` is instantiated during node creation. You can check 36 for the existence of the gvisor `RuntimeClass` using the following command: 37 38 ```shell 39 $ kubectl get runtimeclass/gvisor 40 NAME HANDLER AGE 41 gvisor gvisor 1h 42 ``` 43 44 ### Wordpress deployment 45 46 Now, let's deploy a WordPress site using GKE Sandbox. WordPress site requires 47 two pods: web server in the frontend, MySQL database in the backend. Both 48 applications use `PersistentVolumes` to store the site data. In addition, they 49 use secret store to share MySQL password between them. 50 51 > **Note**: This example uses gVisor to sandbox the frontend web server, but not 52 > the MySQL database backend. In a production setup, due to 53 > [the I/O overhead](../../architecture_guide/performance) imposed by gVisor, 54 > **it is not recommended to run your database in a sandbox**. The frontend is 55 > the critical component with the largest outside attack surface, where gVisor's 56 > security/performance trade-off makes the most sense. See the 57 > [Production guide] for more details. 58 59 First, let's download the deployment configuration files to add the runtime 60 class annotation to them: 61 62 ```shell 63 curl -LO https://k8s.io/examples/application/wordpress/wordpress-deployment.yaml 64 curl -LO https://k8s.io/examples/application/wordpress/mysql-deployment.yaml 65 ``` 66 67 Add a **spec.template.spec.runtimeClassName** set to **gvisor** to both files, 68 as shown below: 69 70 **wordpress-deployment.yaml:** 71 72 ```yaml 73 apiVersion: v1 74 kind: Service 75 metadata: 76 name: wordpress 77 labels: 78 app: wordpress 79 spec: 80 ports: 81 - port: 80 82 selector: 83 app: wordpress 84 tier: frontend 85 type: LoadBalancer 86 --- 87 apiVersion: v1 88 kind: PersistentVolumeClaim 89 metadata: 90 name: wp-pv-claim 91 labels: 92 app: wordpress 93 spec: 94 accessModes: 95 - ReadWriteOnce 96 resources: 97 requests: 98 storage: 20Gi 99 --- 100 apiVersion: apps/v1 101 kind: Deployment 102 metadata: 103 name: wordpress 104 labels: 105 app: wordpress 106 spec: 107 selector: 108 matchLabels: 109 app: wordpress 110 tier: frontend 111 strategy: 112 type: Recreate 113 template: 114 metadata: 115 labels: 116 app: wordpress 117 tier: frontend 118 spec: 119 runtimeClassName: gvisor # ADD THIS LINE 120 containers: 121 - image: wordpress:4.8-apache 122 name: wordpress 123 env: 124 - name: WORDPRESS_DB_HOST 125 value: wordpress-mysql 126 - name: WORDPRESS_DB_PASSWORD 127 valueFrom: 128 secretKeyRef: 129 name: mysql-pass 130 key: password 131 ports: 132 - containerPort: 80 133 name: wordpress 134 volumeMounts: 135 - name: wordpress-persistent-storage 136 mountPath: /var/www/html 137 volumes: 138 - name: wordpress-persistent-storage 139 persistentVolumeClaim: 140 claimName: wp-pv-claim 141 ``` 142 143 **mysql-deployment.yaml:** 144 145 ```yaml 146 apiVersion: v1 147 kind: Service 148 metadata: 149 name: wordpress-mysql 150 labels: 151 app: wordpress 152 spec: 153 ports: 154 - port: 3306 155 selector: 156 app: wordpress 157 tier: mysql 158 clusterIP: None 159 --- 160 apiVersion: v1 161 kind: PersistentVolumeClaim 162 metadata: 163 name: mysql-pv-claim 164 labels: 165 app: wordpress 166 spec: 167 accessModes: 168 - ReadWriteOnce 169 resources: 170 requests: 171 storage: 20Gi 172 --- 173 apiVersion: apps/v1 174 kind: Deployment 175 metadata: 176 name: wordpress-mysql 177 labels: 178 app: wordpress 179 spec: 180 selector: 181 matchLabels: 182 app: wordpress 183 tier: mysql 184 strategy: 185 type: Recreate 186 template: 187 metadata: 188 labels: 189 app: wordpress 190 tier: mysql 191 spec: 192 #runtimeClassName: gvisor # Uncomment this line if you want to sandbox the database. 193 containers: 194 - image: mysql:5.6 195 name: mysql 196 env: 197 - name: MYSQL_ROOT_PASSWORD 198 valueFrom: 199 secretKeyRef: 200 name: mysql-pass 201 key: password 202 ports: 203 - containerPort: 3306 204 name: mysql 205 volumeMounts: 206 - name: mysql-persistent-storage 207 mountPath: /var/lib/mysql 208 volumes: 209 - name: mysql-persistent-storage 210 persistentVolumeClaim: 211 claimName: mysql-pv-claim 212 ``` 213 214 Note that apart from `runtimeClassName: gvisor`, nothing else about the 215 Deployment has is changed. 216 217 You are now ready to deploy the entire application. Just create a secret to 218 store MySQL's password and *apply* both deployments: 219 220 ```shell 221 $ kubectl create secret generic mysql-pass --from-literal=password=${YOUR_SECRET_PASSWORD_HERE?} 222 $ kubectl apply -f mysql-deployment.yaml 223 $ kubectl apply -f wordpress-deployment.yaml 224 ``` 225 226 Wait for the deployments to be ready and an external IP to be assigned to the 227 Wordpress service: 228 229 ```shell 230 $ watch kubectl get service wordpress 231 NAME TYPE CLUSTER-IP EXTERNAL-IP PORT(S) AGE 232 wordpress LoadBalancer 10.120.16.63 35.203.179.216 80:31025/TCP 1m 233 ``` 234 235 Now, copy the service's `EXTERNAL-IP` from above to your favorite browser to 236 view and configure your new WordPress site. 237 238 Congratulations! You have just deployed a WordPress site using GKE Sandbox. 239 240 ### What's next 241 242 To learn more about GKE Sandbox and how to run your deployment securely, take a 243 look at the [documentation][gke-sandbox-docs]. 244 245 Before taking this deployment to production, review the [Production guide]. 246 247 [gke-sandbox-docs]: https://cloud.google.com/kubernetes-engine/docs/how-to/sandbox-pods 248 [gke-sandbox]: https://cloud.google.com/kubernetes-engine/sandbox/ 249 [project-selector]: https://console.cloud.google.com/projectselector/kubernetes 250 [wordpress]: https://wordpress.com/ 251 [Production guide]: /docs/user_guide/production/